Use @[Storyboard Ref] as the storyboard for the sequence. Treat every storyboard panel as a consecutive shot within a single cinematic sequence. Follow panel order exactly and do not invent alternative coverage. Recreate the filmed sequence implied by the panels rather than the physical storyboard artwork.
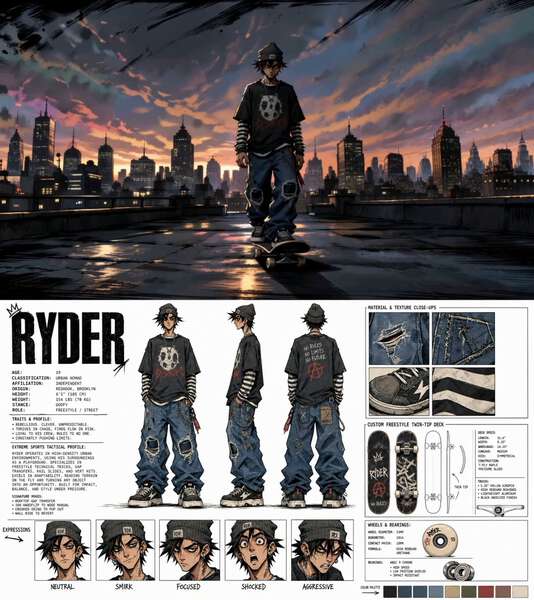
Use @[Char ref] as C1 reference.
Use @[Droideka ref] as C2 combat droid reference.
EMOTIONAL GUIDANCE: Valence: focused calm into controlled danger into decisive release. Arousal: ignition -> reveal -> blaster spike -> repeated deflections -> storm pressure -> pause -> one-way barrage -> flank burst -> impact, shown through eye-line, footwork, white blade height, cloak snap, droid drive, sparks, spray, collapse.
AUDIO: No background music or score. Use only diegetic ambience, foley, impacts, texture, and silence: lake laps, servos, white saber hum, blasters, deflections, water hiss, boots, cloak snap, metal collapse.
BEATS:
1: Profile push. C1 ignites the white saber; light reflects on wet sand, water, and the grounded craft.
2: Low wide. C2 unfolds into tripod combat stance at the forest edge, twin blasters rotating toward C1.
3: Macro burst. Red bolts erupt from both cannons through mist and shoreline spray.
4: Low burst. C1 pivots, boots slicing shallow water as the first volley closes.
5: Clash. The white saber catches bolts; sparks and reflected plasma scatter across shore.
6: Tight. C1's eye-line shifts as C2 changes angle and intensifies fire.
7: Wide flow. C1 advances, repeatedly deflecting red bolts back with white saber arcs.
8: Overhead. Red bolts converge while C1 stays centered, deflecting the storm back toward C2.
9: Side track. C2 lunges on tripod legs, closing distance under suppressive fire.
10: Impact. Reflected plasma hits C2 armor, forcing a brief stagger without stopping it.
11: Water insert. White saber trail curves across the lake reflection as bolts skip and hiss.
12: Portrait pause. C1 and C2 hang still; saber hum, water drip, and servos fill the air.
13: Orbit. All incoming red bolts come from one direction only, from C2's side; C1's white saber wraps a luminous cage that deflects the wall of fire.
14: Burst close. C1 slips past the final volley, cloak snapping as she reaches C2's flank.
15: Hero finish. The white saber cuts exposed mechanisms beneath C2; sparks and parts explode outward as the droid collapses into the shoreline.
Use @[Storyboard Ref] as the storyboard for the sequence. Treat every storyboard panel as a consecutive shot within a single cinematic sequence. Follow panel order exactly and do not invent alternative coverage. Recreate the filmed sequence implied by the panels rather than the physical storyboard artwork.
Use @[Char ref] as C1 reference.
Use @[Droideka ref] as C2 combat droid reference.
EMOTIONAL GUIDANCE: Valence: focused calm into controlled danger into decisive release. Arousal: ignition -> reveal -> blaster spike -> repeated deflections -> storm pressure -> pause -> one-way barrage -> flank burst -> impact, shown through eye-line, footwork, white blade height, cloak snap, droid drive, sparks, spray, collapse.
AUDIO: No background music or score. Use only diegetic ambience, foley, impacts, texture, and silence: lake laps, servos, white saber hum, blasters, deflections, water hiss, boots, cloak snap, metal collapse.
BEATS:
1: Profile push. C1 ignites the white saber; light reflects on wet sand, water, and the grounded craft.
2: Low wide. C2 unfolds into tripod combat stance at the forest edge, twin blasters rotating toward C1.
3: Macro burst. Red bolts erupt from both cannons through mist and shoreline spray.
4: Low burst. C1 pivots, boots slicing shallow water as the first volley closes.
5: Clash. The white saber catches bolts; sparks and reflected plasma scatter across shore.
6: Tight. C1’s eye-line shifts as C2 changes angle and intensifies fire.
7: Wide flow. C1 advances, repeatedly deflecting red bolts back with white saber arcs.
8: Overhead. Red bolts converge while C1 stays centered, deflecting the storm back toward C2.
9: Side track. C2 lunges on tripod legs, closing distance under suppressive fire.
10: Impact. Reflected plasma hits C2 armor, forcing a brief stagger without stopping it.
11: Water insert. White saber trail curves across the lake reflection as bolts skip and hiss.
12: Portrait pause. C1 and C2 hang still; saber hum, water drip, and servos fill the air.
13: Orbit. All incoming red bolts come from one direction only, from C2’s side; C1’s white saber wraps a luminous cage that deflects the wall of fire.
14: Burst close. C1 slips past the final volley, cloak snapping as she reaches C2’s flank.
15: Hero finish. The white saber cuts exposed mechanisms beneath C2; sparks and parts explode outward as the droid collapses into the shoreline.
Massive abandoned spacecraft, drifting, silent, until sudden partial reactivation creates unstable, shifting internal conditions.
Docking approach: small ship attaches carefully, everything still.
Entry: interior dark, debris floating, no gravity.
First change: lights flicker violently, sections powering up unevenly.
Floor shift: gravity slams back on in one section, throwing everything down.
Corridor movement: bulkheads begin sliding, layout changing in real time.
Near-trap: path closes behind the pilot, forcing a sprint forward.
System surge: doors opening and slamming unpredictably.
Pressure breach: one wrong turn leads to a sudden decompression blast.
Escape run: pilot navigating a corridor that's actively reconfiguring.
Final moment: ship barely undocks as the entire structure begins moving under its own power.
Claustrophobic, mechanical instability, constant "wrong place at the wrong time."
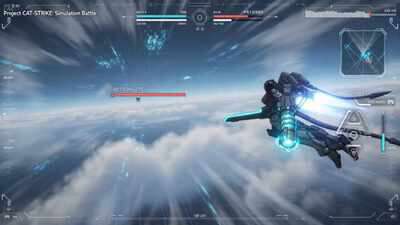
「シミュレーションバトル風」
High-End 3D Animation / Fluid Cel-Shaded Realism VFX simulation battle featuring a dogfight between two fighter aircraft with HUD overlays, dramatic beam attacks, signature poses, and a cinematic explosion sequence. The prompt is structured as a timed sequence with camera movement, VFX, lighting, and audio cues.
Scene breakdown:
- 0-2.5s: Afterburner fly-by with screen shake and digital grid clouds
- 2.5-4.5s: Radio window + dramatic pull-in camera
- 4.5-7.5s: Dogfight beam barrage with sparks and signature pose
- 7.5-9s: Cinematic cut-in with eye spark reflections
- 9-11.5s: Ultimate attack with spatial distortion and impact frame
- 11.5-13.5s: Enemy destruction explosion with claw-pattern particle smoke
- 13.5-15s: Departure into starfield with heat haze fade
Cinematic 15-second multi-shot action sequence in a realistic modern subway carriage at night, dim fluorescent lighting with flickering overhead lights, cool blue and purple tones, high contrast shadows, subtle film grain, photorealistic style with dynamic camera work.
Shot 1 (0-4s): Medium shot, slight handheld camera. A cute 18-year-old East Asian girl with long black hair in twin pigtails and bangs, wearing a casual white blouse and pleated skirt, sits calmly on a subway seat reading a small book. She looks peaceful and immersed. The empty subway car sways gently. Subway windows show dark tunnel lights passing by.
Sudden chaos: A massive, terrifying monstrous creature (grotesque alien-like with sharp claws, tentacles, glowing red eyes, dark slimy skin, and jagged teeth) bursts violently into the carriage from the left, smashing seats and roaring aggressively. Debris flies, dramatic motion blur on the attack.
Shot 2 (4-8s): Fast-paced action, dynamic camera tracking and quick cuts. The girl looks up startled for a split second, then her body glows with intense bright blue cyber energy. Epic transformation sequence: Her clothes dissolve into glowing blue cybernetic armor with futuristic metallic plates, neon blue accents, holographic elements, and sleek helmet. Energy particles and light trails swirl around her. She stands up powerfully.
Shot 3 (8-12s): High-energy fight sequence, orbiting camera and low-angle heroic shots. The armored girl unleashes powers — blue energy blasts from her hands, summoned energy sword and weapons. She dodges the monster's attacks with agile movements, counters with powerful slashes, punches, and energy explosions that damage the monster and subway interior (sparks, broken seats, shattered windows). Intense motion, particle effects, glowing trails, dramatic lighting flashes.
Shot 4 (12-15s): Calm resolution, smooth pull-back camera. The monster is defeated and dissipates. The girl's armor glows and fades away, transforming back to her normal casual outfit and pigtails. She sits back down peacefully on the seat, picks up her book, and resumes reading calmly as if nothing happened. Subway continues moving smoothly. Peaceful atmosphere returns.
Highly detailed, consistent character face and proportions throughout, smooth transitions between shots, strong motion control, cinematic lighting, realistic physics on debris and energy effects, no text, no watermark, 16:9 aspect ratio, 1080p or higher, fluid 24fps motion.
action
transformation
cinematic
multi-shot
character
FPV shot: Diving through a collapsing orbital station entering Earth's atmosphere
The camera races through burning corridors as alarms flash red. Metal panels rip apart, sparks and debris spiral in zero gravity. As the station breaks apart over Earth, flaming fragments align into "DESCENT" before exploding into the atmosphere.
Space disaster, cinematic reentry, catastrophic scale.
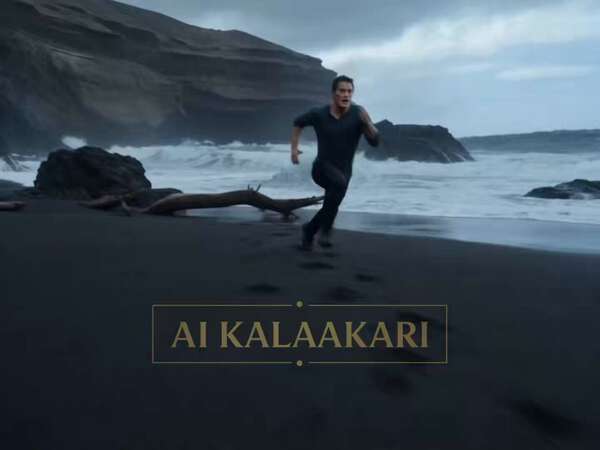
Nightmare island coastline. Black volcanic sand, jagged rock formations, crashing waves, thick storm clouds overhead. The beach feels abandoned and prehistoric. Hyper-real creature-feature action. Aggressive handheld camera, rapid cut-tos, speed ramps, low-angle tracking shots, crash zooms. Sound: crashing surf, crocodile roars, clicking crab claws, sand eruptions, frantic breathing.
0–2s — HOOK
Low-angle tracking shot.
A survivor is already sprinting across a black sand beach.
Completely exhausted.
Behind him—
A gigantic mega crocodile explodes from a tidal pool.
Forty feet long.
Covered in scars.
Its massive body bulldozes through driftwood and rocks.
The beach shakes beneath every step.
2–5s — ESCALATION
Side tracking shot.
The survivor runs flat out.
The crocodile gains rapidly.
Its jaws snap shut inches behind him.
Sand erupts everywhere.
The survivor glances ahead.
The beach is covered with thousands of strange dark boulders.
No time to think.
He runs directly into them.
5–8s — REVEAL
Wide shot.
The "boulders" start moving.
One.
Ten.
Hundreds.
Thousands.
The entire beach comes alive.
Gigantic armored crabs emerge from beneath the sand.
Some as large as motorcycles.
Massive claws.
Thick black shells.
The survivor weaves through them.
The crocodile crashes straight into the colony.
8–11s — CHAOS
The crab swarm attacks instantly.
Hundreds of claws snap at the crocodile.
The crocodile retaliates violently.
Crushing crabs.
Throwing them aside.
Tearing through the colony.
The beach becomes complete chaos.
Shells flying.
Sand clouds everywhere.
The survivor keeps running.
11–13s — THE TWIST
The fighting suddenly stops.
The sand beneath the battlefield begins vibrating.
A deep rumble.
Everything freezes.
Even the crocodile.
Then—
The beach erupts.
13–15s — SHOCKING PAYOFF
A colossal alpha crab bursts from beneath the sand.
The size of a truck.
One claw larger than a car.
Before the crocodile can react—
The giant claw snaps around its neck.
Lifts the crocodile completely off the ground.
The survivor turns and watches in disbelief.
Then a second giant claw emerges from beneath the sand behind him.
Seedance 2 extension prompt -
The giant crab fights back fiercely as the smaller crabs swarm the crocodile. The crocodile, powerful and aggressive, slams the massive crab into the sand while swatting the smaller ones away, sending them flying through the air. The giant crab charges again. Both creatures leap at each other and collide violently mid-air.
Suddenly, a massive tentacle erupts from the sea. A colossal giant squid rises from the depths, its enormous arms lashing out. It seizes both the crab and the crocodile, hurls them into the sky, and devours them whole. Watching in horror, the person turns and sprints into a nearby cave.
 Seedance 2.0