 Seedance 2.0
Classic Pancake Stack Tutorial
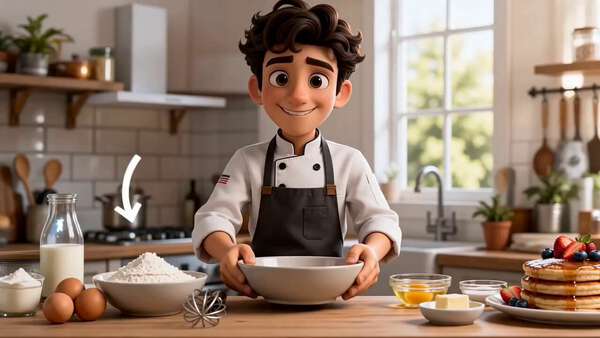
Classic Pancake Stack — First 15 Seconds
Use the attached CLASSIC PANCAKE STACK storyboard image as the main reference.

IMPORTANT:
Animate ONLY PART 1 — the TOP HALF of the storyboard.
Do not animate Part 2 in this clip.
This is the FIRST 15 SECONDS of a 30-second pancake tutorial.
Follow the sequence exactly in order from shots 1 to 10.
Do not skip, reorder, merge, or invent steps.

GOAL:
Create a beautiful 15-second cooking tutorial video that brings the TOP HALF of the storyboard to life as a premium food video. The result should feel polished, appetizing, clean, and easy to follow, with strong continuity and clear action.

STYLE:
High-quality stylized 3D cooking video, bright premium brunch aesthetic, warm natural kitchen lighting, clean white and wood tones, appetizing golden food rendering, glossy batter texture, realistic steam and pan heat, charming chef performance. Keep the same young male chef throughout: expressive face, dark brown wavy hair, white chef jacket with black buttons, dark apron. Keep the kitchen setting visually consistent.

AUDIO:
No background music.
Use environment and cooking sounds only:
light kitchen room tone, whisking, bowl handling, butter sizzling, batter pouring, pancake sizzling, spatula movement, soft cooking ambience.
No voiceover.
No lyrics.
No music.

TIMING:
15 seconds total.
10 shots total.
About 1.5 seconds per shot.
Use clean, quick cuts.
Each shot should show one clear action.

SHOT ORDER — FOLLOW EXACTLY:

SHOT 1 — INGREDIENTS READY
Chef presents the ingredients neatly on the counter: flour, eggs, milk, sugar, baking powder, melted butter, salt, whisk, bowl, and pan.
Bright and organized.
Show an inviting setup.

SHOT 2 — DRY MIX
Chef adds dry ingredients into a bowl: flour, sugar, baking powder, and salt.
Make the pouring and bowl composition clear and tidy.

SHOT 3 — WET MIX
Chef adds wet ingredients: eggs, milk, and melted butter.
Show clean pouring motion and attractive ingredient textures.

SHOT 4 — WHISK BATTER
Chef whisks the batter until smooth.
Show a creamy, silky batter texture.
Make the whisk motion satisfying and readable.

SHOT 5 — HEAT PAN
Show the pan heating with butter melting or lightly greasing the pan.
Make the butter melt visible.
Show subtle heat and pan shimmer.

SHOT 6 — POUR BATTER
Chef pours batter into the pan in a neat round shape.
Show the batter spreading into an even pancake.

SHOT 7 — BUBBLES FORM
Close-up of the pancake surface as bubbles form.
Make this clear and visually satisfying.

SHOT 8 — FLIP
Chef flips the pancake with a spatula.
The motion should be clean and confident.
Avoid chaotic motion.

SHOT 9 — GOLDEN FINISH
Show the pancake cooking on the second side with a beautiful golden-brown finish.
Highlight texture and warmth.

SHOT 10 — SET ASIDE
Chef transfers the finished pancake to a plate or stacking area.
This shot should visually set up the next part.

CAMERA DIRECTION:
Use a mix of medium shots and close-ups.
Use top-down angles for mixing when useful.
Use 3/4 angle for the pan and flipping actions.
Keep movement smooth and readable.
Do not use shaky or chaotic camera movement.

VISUAL CONTINUITY:
Keep the chef identical across all shots.
Keep the countertop, bowls, pan, lighting, and ingredients consistent.
Make sure Part 1 ends in a way that naturally leads into stacking pancakes in Part 2.

NEGATIVE INSTRUCTIONS:
Do not animate the bottom half / Part 2 in this clip.
Do not add syrup, berries, powdered sugar, or final plating yet.
Do not change the chef design.
Do not add extra characters.
Do not add text overlays.
Do not add music.
Do not skip steps.
Do not show the final pancake stack yet.

END STATE:
End with several cooked pancakes ready to be stacked, so the next clip can continue naturally.